Archives: Calculators

  • Fence Post Concrete Calculator: Bags per Post Hole

    Fence Post Concrete Calculator: Bags per Post Hole

    Enter the hole diameter, hole depth, number of posts and post size to see how many bags of concrete you need to set fence posts, deck posts or mailbox posts. The calculator subtracts the space the post takes up, so you do not overbuy.

    How the post hole calculator works

    • Hole volume = π × (diameter ÷ 2)² × depth
    • Post volume = post width × post thickness × depth (actual size: a 4×4 is 3.5 × 3.5 in)
    • Concrete per hole = hole volume − post volume
    • Bags = concrete for all holes, plus waste, ÷ yield per bag, rounded up

    Worked example

    Ten fence posts set in 10-inch holes, 24 inches deep, with 4×4 posts: each hole holds 1.09 cubic feet, and the post takes up 0.17 cubic feet, leaving 0.92 cubic feet of concrete per hole. For ten holes that is 9.2 cubic feet, or 15.3 bags of 80 lb concrete, so you buy 16 bags. With the default 10% extra, plan for 17 bags.

    How big and deep should post holes be?

    A common rule of thumb is a hole about three times the width of the post, so roughly 10 to 12 inches for a 4×4. Depth depends on the height of the post, the soil and how deep the ground freezes in your area; local building codes often set a minimum, so check them before you dig.

    Step by step: setting a fence post in concrete

    The calculator gives you the number of bags. Here is how the job goes from an empty hole to a finished post.

    Post hole digger next to a round hole, with arrows showing hole diameter and depth
    Step 1. Dig a round hole about three times as wide as the post. Its diameter and depth are the two numbers the calculator needs.
    Wooden post standing on a gravel layer in the hole, checked for plumb with a spirit level
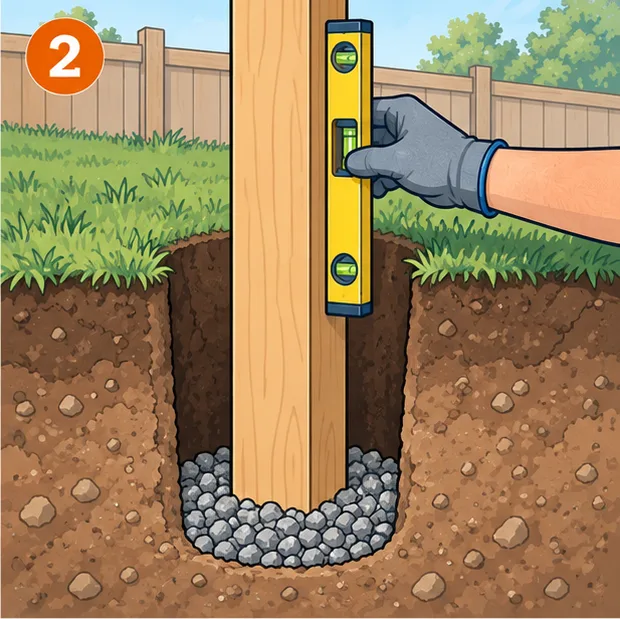
    Step 2. Add a few inches of gravel for drainage, stand the post on it and check it is plumb on two sides with a level.
    Dry concrete mix poured around the post, then water added from a bucket
    Step 3. Pour the dry concrete mix around the post, then add water as the bag directs. Keep checking the post is plumb.
    Finished post with the concrete top sloped away so water runs off
    Step 4. Shape the top of the concrete so it slopes away from the post and water runs off instead of pooling.

    Tips

    • Put a few inches of gravel in the bottom of each hole for drainage. If you do, reduce the depth you enter by the same amount.
    • Fast-setting concrete mixes are poured dry and then watered; their yield per bag is similar to standard mixes but check the label.
    • Slope the top of the concrete away from the post so water runs off.
  • Flooring Calculator: Square Feet, Waste and Boxes

    Flooring Calculator: Square Feet, Waste and Boxes

    Enter the length and width of your room to get the floor area, add a waste allowance for cuts, and, if you know how much one box covers, see how many boxes to buy. You can add up to three rectangles for L-shaped rooms.

    How the flooring calculator works

    • Floor area = length × width, summed over each rectangle
    • Area to buy = floor area × (1 + waste % ÷ 100)
    • Boxes = area to buy ÷ coverage per box, rounded up

    Worked example

    A 12 × 15 ft living room has 180 sq ft of floor. With 10% waste you should buy 198 sq ft. If a box of laminate covers 20 sq ft, you need 198 ÷ 20 = 9.9, so 10 boxes.

    How much extra flooring to buy

    • Straight layouts: about 5 to 10%
    • Diagonal or herringbone layouts: about 10 to 15%, because angled cuts waste more material
    • Small rooms, closets and rooms with many corners tend to need the higher end of the range

    Choosing the diagonal pattern in the calculator switches the default to 15%. You can enter your own percentage at any time.

    Step by step: measuring and buying flooring

    Follow these steps to get the numbers the calculator needs and to order the right amount.

    Floor plan of an L-shaped room split into two rectangles with dimension arrows
    Step 1. Sketch the floor plan and split L-shaped rooms into rectangles. Enter each rectangle as its own area.
    Measuring a room wall to wall with a tape measure
    Step 2. Measure each rectangle wall to wall, including closets and the space under doors.
    Laminate planks laid in staggered rows with offcut pieces showing waste
    Step 3. Lay planks in staggered rows. The offcuts at the walls are why you add a waste allowance.
    Stack of flooring boxes with one spare box set aside
    Step 4. Buy the number of boxes the calculator shows, and keep one spare box for future repairs.

    Tips before you order

    • Measure closets and include the area under doors and thresholds.
    • Buy all boxes from the same production lot so color and texture match.
    • Keep one spare box for future repairs.
  • Paint Calculator: How Much Paint Do You Need for a Room?

    Paint Calculator: How Much Paint Do You Need for a Room?

    Enter the size of the room, the number of doors and windows and how many coats you plan to apply. The calculator shows the paintable wall area, the gallons you need and a suggested mix of cans to buy.

    How the paint calculator works

    • Wall area = 2 × (length + width) × wall height
    • Each door subtracts 21 sq ft (3 × 7 ft) and each window 15 sq ft (3 × 5 ft)
    • Paint = paintable area × coats ÷ coverage per gallon, plus the waste allowance

    Worked example

    A 12 × 12 ft bedroom with 8 ft walls, one door and one window has 384 sq ft of wall. Minus 36 sq ft for the door and window leaves 348 sq ft. Two coats at 350 sq ft per gallon need 696 ÷ 350 = about 2 gallons. With 5% extra that is 2.09 gallons: two 1-gallon cans and a quart.

    What coverage should you use?

    Most interior wall paints list 350 to 400 sq ft per gallon for a smooth, primed surface. This calculator starts at 350 sq ft so the estimate errs on the safe side. Use a lower number for rough or porous surfaces, new drywall, or a big color change, and check the label on the paint you are buying.

    Step by step: painting a room

    Measure first, then paint. These four steps match the inputs in the calculator above.

    Tape measure along the bottom of a wall with arrows showing wall length and height
    Step 1. Measure the length of each wall along the floor, and the wall height from floor to ceiling.
    Door and window outlined with painter's tape to show the areas subtracted from the wall
    Step 2. Count the doors and windows. Each one is subtracted from the wall area, so you do not buy paint for them.
    Cutting in along the ceiling line with an angled brush, with a roller and tray below
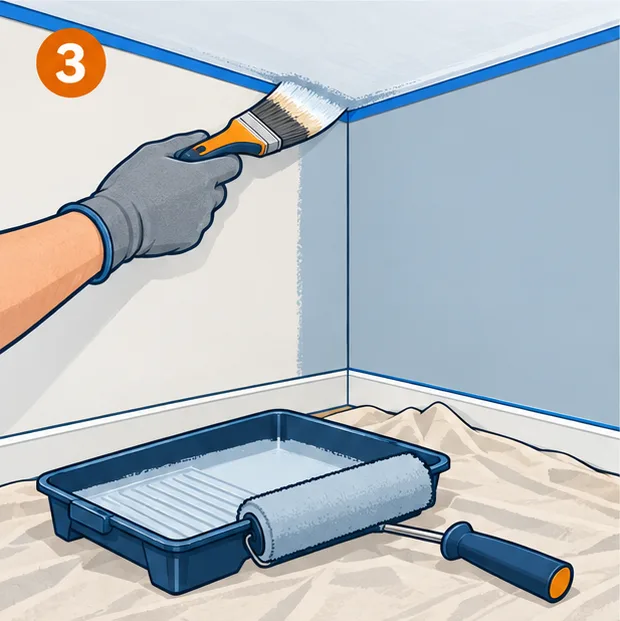
    Step 3. Cut in along the ceiling, corners and trim with an angled brush before you roll.
    Roller applying a second coat of paint next to a gallon and a quart can
    Step 4. Roll the walls, let the first coat dry fully, then apply the second coat.

    Buying tips

    • If you need four gallons or more, a 5-gallon bucket is usually cheaper than single gallons.
    • Buy all the paint for a room from the same batch, or mix the cans together in a larger bucket, so the color stays consistent.
    • Keep a small amount for touch-ups and write the color name and number on the lid.
  • Concrete Calculator: Slab Volume and Bags

    Concrete Calculator: Slab Volume and Bags

    Enter the length, width and thickness of your slab to see how much concrete you need and how many pre-mixed bags to buy. The result includes an allowance for waste and spillage that you can change.

    How the concrete calculator works

    The calculator multiplies length × width × thickness to get the volume of the slab, adds the waste allowance, and divides by the yield of the bag size you picked. Bag counts are always rounded up to the next whole bag.

    • Volume = length × width × thickness
    • Concrete to order = volume × (1 + waste % ÷ 100)
    • Bags = concrete to order ÷ yield per bag, rounded up

    Worked example

    A 10 ft × 10 ft patio slab poured 4 inches thick: 10 × 10 × (4 ÷ 12) = 33.3 cubic feet, or 1.23 cubic yards. With 10% extra for waste, plan for 36.7 cubic feet (1.36 cubic yards). An 80 lb bag of pre-mixed concrete yields about 0.60 cubic feet, so you would need 62 bags.

    Bag yields used in this calculator

    • 80 lb bag: about 0.60 cubic feet
    • 60 lb bag: about 0.45 cubic feet
    • 40 lb bag: about 0.30 cubic feet

    Yields vary slightly between brands and mixes, so check the label on the bag you plan to buy.

    Bags or ready-mix?

    Above roughly one cubic yard (about 45 bags of 80 lb), mixing by hand gets slow and it becomes hard to keep the pour consistent. For larger slabs, compare the cost of bags with a ready-mix delivery. Many suppliers charge a short-load fee for small orders, so ask before you decide.

    Step by step: from measuring to pouring

    The calculator handles the math. These are the measurements it needs and how they fit into the job.

    Wooden form staked on a gravel base with a tape measure along the length and width
    Step 1. Measure the length and width inside the form. For an L-shaped slab, measure each rectangle separately.
    Tape measure inside the form measuring slab thickness from the gravel base to the top of the form
    Step 2. Measure from the compacted base to the top of the form board. This depth is your slab thickness.
    Concrete mix bags next to a wheelbarrow of mixed concrete and a hoe
    Step 3. Buy the number of bags the calculator shows, including the waste allowance, and mix one bag at a time.
    Gloved hands pulling a straight board across fresh concrete to level the slab
    Step 4. Fill the form and pull a straight board across the top in a sawing motion to level the concrete.

    Tips for measuring

    • If the ground is uneven, measure the depth in several places and use the average.
    • Split L-shaped or irregular slabs into rectangles, calculate each one and add them up.
    • Order a little extra. Running short in the middle of a pour leaves a weak joint where fresh concrete meets concrete that has started to set.

    These results are estimates. The right thickness, base and reinforcement depend on what the slab will carry and on local building codes, so check with a qualified professional for structural work.